Monday, March 31, 2014

Softly (you)...again


Pattern: Softly (you) by Solenn Couix-Loarer
Yarn: De Rerum Natura Ulysee in colorways Poivre et Sel (3 skeins) and Baleine Bleue (about 40yds)
Needles: US 3, US 5
Size: 2 yrs
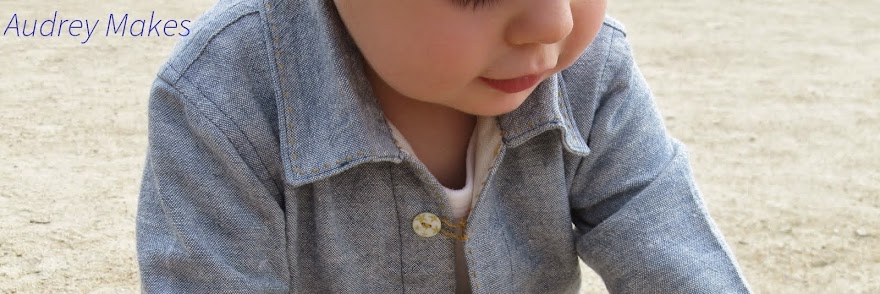
Here it is, my second sweater knit from Solenn Couix-Loarer's pattern, Softly (you) (the first one is here) As you can probably tell, I really really like this pattern. And most important of all, my son adores this, well, both sweaters! There was pretty much the same reaction as the first time. "Pull, pull" (L is saying sweater in French.) He's very much into trying to dress himself right now, so of course he tried to put it on himself. Not entirely successful, but oh so cute! I wish I had a photo of it!

I used the same yarn, De Rerum Natura's Ulysse in the identical color for the main body: colorway Poivre et Sel. For the stripes, I used a navy blue, also in Ulysse, called Baleine Bleue, which I had bought quite a few skeins of to make a sweater for me, which I hope to share in the coming weeks once it's finished. What can I say? I really like this yarn. This is (counting my unfinished sweater) the third time I use it.

I have a slight preference for the yellow version of the sweater because of the cheerfulness of the yellow, but truly, they're both lovely. I'm very pleased with both, and I'm surprised by the fact that I knit the same pattern twice in practically the same colors shortly one after the other. I think there's about a week between the two! But I guess seeing how thrilled my baby boy was, was motivation enough to dive right back in!

(If the sweater looks a little askew that's because I got him dressed in a hurry for a doctor's appointment.)


Friday, March 28, 2014

Dotty Shirt

Pattern: Chemisier à Col Mao in the book Jolies Tenues Pour Fillettes Coquettes by Akiko MANO
Fabric: Leftover bits of Nani IRO Colorful Pocho ( I believe from 2011)
Notions: Off-white thread
Size: 100 cm graded down to fit 2T


Doesn't it look like candy dots? I have to say that I love this shirt- it's so darn cute! I was inspired by this shirt I had seen last year and as I had some leftover pieces of this dotty print, it happened! With a bit of fiddling with the pattern to grade it down for my almost 2 year old and some artful and at times mischievious cutting (some of those edges are the selvedge edges), I ended up with a most pleasing shirt! It was meant to be a birthday shirt...but he looks so cute in it. I don't think I can wait!
 
This was a first time using a Japanese pattern for me (although my copy of the book is the French translation, so there isn't anywhere near as much puzzling out to do.) I took a bit of width out, using some other patterns as reference for size. The book is intended for girls but I think a few of the patterns are just fine for boys, although I did take out the gathers at the sleeves in this one.


Creative cutting allowed me to get the dot placement pretty close to where I wanted - that central white area framed by the red dots was one of my goals to showcase the rows of stitching at the center front. Ah yes, the center front. That part required some serious attention. These lines were 0.7 cm apart and 0.2 cm from the outer edge. I think I was cross-eyed by the end but so pleased! I kept showing it to my husband after each new line of stitching. "See, see!"


The only thing I had an issue with in the pattern was the finishing. The pattern calls for zig-zagging edges but this fabric was fraying a mile a minute, so zig-zagging was not going to cut it. I did French seams and flat felled seams. Hopefully that will keep it together!

I love the final result! And it fits him really well. Oh so adorable! I have a few very odd scraps left. We'll see if I can get creative with them and find a way to use them. (The pants he's wearing in the pictures are a pair of Art Museum Pants by Oliver + S that I made last year.)

Tuesday, March 25, 2014

Bicycle PJ's for L


 Patterns: Top - Fieldtrip Raglan T-Shirt by Oliver + S
               Pants - Nature Walk Pants by Oliver + S
Fabric: Jay Cyn Designs for Birch Organic Fabrics, Just For Fun KNITS, Bike It - squeezed out of 1 yard
Notions: Off-white thread, 3/4" elastic for pants waistband
Size: 2T for both


Little L was in sore need of new jammies. He's outgrown all of them and don't even mention the ones with feet! They're ridiculous! We were about to go stay at Grandpère's for a bit (seriously, we were leaving first thing the next morning!) and I wanted to have a set ready before we left. Unrealistic, no? But I guess sometimes I am so tenacious that it just works out. I picked up the fabric while I was on my last vacation in the US, hoping I would obtain good results from it. And I haven't been disappointed!

Sewing with knits is actually not such an intimidating thought for me since some of my very first sewing projects were with knits.I was cautious and read up a lot before starting with them and to my great satisfaction, those first projects turned out very well, and are still holding up beautifully over a year later! Even with my very basic sewing machine, where I use a small zig-zag. Knits, here I come!


 I wanted a very comfortable set of pyjamas that would be quick to make, as I had a ridiculous deadline, so, to hope to achieve my goal, I selected the Oliver + S Raglan T and Nature Walk Pants. It was my first time making both of the patterns, but with the combination of excellent instructions, drafting, and a very cooperative fabric, I was done in record time in what was a really pleasurable sewing experience!

 I was most nervous about the neckline but that too went without a hiccup. I carefully read the instructions and reminded myself of Made-By-Rae's posts on knit neckline's that I had read a few days before. I carefully stretched the piece to fit and stretched it as I sewed it in, and it fit perfectly. Sheer joy! The pants were a breeze. I reinforced the crotch seam by sewing it a second time and the few pieces needed came together effortlessly.


Just one last thing: twin needle stitching for that professional-looking finish. But just when I was about to bring out the twin needle, I remembered it was broken, so I ended up stitching both lines with a single needle and carefully, and I mean very carefully, keeping the lines the same distance apart. I actually hemmed at this stage. I think it looks good, despite having the extra work to do a double line.

L seems to like these as they don't restrict his movement. But goodness does that boy have the wiggles! Pretty hard to get good photos. Most of them came out blurry with an arm whizzing by! His jammies were quite a hit with the other kids at Grandpère's since they have bicycles on them. Oh, I nearly forgot, but they work well, even though L is still in diapers.

 He almost looks like he's counting here.

Wednesday, March 19, 2014

Knitting for little footsies

Pattern: "it's a guy thing" by Caroline Hegwer
Yarn: Madelinetosh Tosh Sock in colorway Kale
Needles: US 2
Size: 5-6 inch circumference


Ever growing footsies need socks, right? So, I brought out my big box of yarn and went through the fingering sock weight section, pulling out a few left over skeins from previous finished sock projects or from the multitude of little leftovers my mother gave me. I set to work immediately and hey, voilà! A new pair of socks for L's little footsies.

This was actually the first time I knit socks from a pattern that had a design on it. I learned to make socks as a teenager while sitting on the couch next to my mother. She would walk me through it, telling me what to do for each section, which I would do, and then she would tell me what to do for the next. No patterns, just a kind of recipe. When I moved away from home, I would refer to sock recipes like "How I Make My Socks" by Susan B. Anderson to keep me on track, but mainly remembering my knitting sessions with Maman. And since "it's a guy thing" is my mother's sock pattern, I new it would almost feel like we were knitting together again. (Ah, I miss vacation when I get to go see her!)


I really enjoyed certain details that gave the sock a crisp and clean finish, such as the garter stitch edge on the heel flap, which made for a very clean edge after picking up stitches. An improved edge from my previous socks! I'll definitely be using garter stitch on the edge of the heel flap again. I also really liked how easy it was for me to make the different sections shorter or longer to fit my boy. I'm looking forward to making this for myself and my husband.

I chose this leftover Madelinetosh subtly variegated sock yarn, which I thought would bring out the beauty of the texture of the sock. I had used this yarn to make myself a pair of socks last year, but unfortunately those socks are looking rather ragged. I suppose he'll grow out of them before they have time to look ragged though. I had 39 grams and each sock used about 15 - so, I still have a bit left, which I'll have to find a way to use.

I've already made another pair with a leftover skein from my mother. If my memory serves me right, I seem to remember her saying it was Koigu, but I could be wrong. Only 31 grams of yarn here, so it was rick-rack!

Monday, March 17, 2014

Knitting for L: Softly (you)


Pattern: "Softly (you)" by Solenn Couix-Loarer
Yarn: De Rerum Natura Ulysee in colorways Poivre et Sel (3 skeins) and Genêt (about 40yds)
Needles: US 3, US 5
Size: 2 yrs


This was one of the few knitting projects I had up my sleeve for my lovely L's Spring and Summer wardrobe, apart from socks galore. Around here, 'Breton' style sweaters and tops are really popular and remain ever so trendy for kids and adults, season after season, year after year. So, hey, why not make one for L since I already had the e-book?

I also decided to give in to my recent love for yellow by going with a yellow stripe which looks positively golden next to the soft natural color of Poivre et Sel. I can't get enough of yellow next to grey or natural colors and I'm pretty sure it's going to show up again in garments and even the house!


As with many of Solenn's patterns, (I can't believe this is her 10th pattern I've knit! They're just great patterns!) I had to go up a needle size because I knit a bit tight. Once knitting got started, it went really fast. I was racing to get to those stripes, to only be halted when I got to the sleeves. Oh, man! I had forgotten that I dislike these kinds of picked up sleeves from the armholes with short rows worked for the sleeve cap. Sadly, the project sat untouched for a good day or two as I suspiciously eyed those armholes. I knit them as directed by the pattern and I think the sweater looks fantastic despite my not being a fan of these kinds of sleeves.


There are great little details like a faux seam line made by purling one stitch at what would be a side seam or arm seam. It looks really cute!

While I was knitting the sweater, little L would come over to touch it and would say "pull, pull" knowing that it was for him. I finished it during his naptime, folded it nicely, and once he was up and saw it, he grabbed it and tried to put it on himself. Oh, how rewarding is that?! (Happy sigh and I'm already planning another one of these sweaters) He adores it, so I love it too! And I'm so happy with those golden stripes. They make for such a happy sweater! Enjoy, my little L! (In this last indoor picture, he's making his 'can we go to the playground now?' face.)


Sunday, March 16, 2014

Knitting gifts


Ah, birthday season is upon us! Hurray, hurray but this means that much planning is required, and astonishingly so, I'm on schedule, with 3 out of 4 ready to be sent off to their birthday recipients! We actually have 5 birthdays coming up, but my husband's vest, which I started months ahead of time just to be sure to have it ready, is meant to be his birthday gift. (I may try to sneak in a shirt if my sewing schedule allows but shhhh.)

Up first, a knitted iPad case.

Pattern: "Cabled iPad Sleeve" by haramis designs
Yarn: Cascade 220 Heathers  in colorway 2442 (a natural oatmeal-like color)
Needle: US 8
I know, it looks miniscule. How could that ever fit an iPad?! But it has been tested and approved on a borrowed iPad. I was rather nervous making this at first, since I don't have an iPad and had to wait to be able to test it out. Thankfully, it stretches out beautifully and the cables are lovely (although I reduced the number). I added two extra buttons for a total of three as I felt it would be more secure. Birthday project #1, done!

 
 Next, a beanie.


Pattern: "Skyping Beanie" by Halldora
Yarn: Green Mountain Spinnery Cotton Comfort in colorway Storm
Needles: US 4, US 6

 This is actually the second time that I make this hat with this same exact yarn. Normally, I wouldn't knit a pattern twice in the same yarn, but when I remembered my brother enviously eyeing my other brother's new hat, I thought, well...ok. But I was going to add at least a tiny little something and this little embellishment is jewel purpose. One, it helps tell the hats apart so no confusions arise, and two, it's his 18th birthday! I'm pretty sure he'll love this.


Lastly, another slouchy hat.

Pattern: "Starry-Eyed Slouch" by Stepen West
Yarns: Green Mountain Spinnery Cotton Comfort in colorway Storm (used throughout)
            Madelinetosh Merino Light, Iris (a deep blue) and Mica (light blue)
            Madelinetosh Sock , I think it was Composition Book but not completely sure
            Unknown yarn that was given to me, perhaps tencel?

 So, this one is for my other brother. He's quite a hip and stylish kind of guy, so hopefully this will suit his aesthetic taste. I left off the stars and the pompom but I have an idea for another one using more leftover yarn that would use the stars.


 Wait! I said 4 gifts, right? Well, the last one is for an art lover who kindly  appreciates my work. But it's not done yet!

Monday, March 10, 2014

Knitting for me: a smocked cardi


Pattern: "Pretty (me)" by Nadia Crétin-Léchenne from the collection Emmitouflages (used the pattern in French)
Yarn: Malabrigo Arroyo in 131 Sand Bank, 3 skeins
Needle: US 5 for ribbing
             US 6 for body
Size: xs
Notions: 10 mother-of-pearl buttons (15 mm)

This cardi was a labor of love but I am quite pleased with the finished product! I say it was a labor of love because there were some errors on my part (nothing to do with the pattern) that ended up with me undoing a half finished project. Gahhh!!! Silly, girl! How did you end up using a US 4 instead of  a US 6? I have a number of hypotheses as to how this disas...mistake happened but when the cardi started to look like it would just about fit a 5 year old I knew something was awry! Anyhow, being the person that I am, I ripped it back and started again the same day.


All that said and done, phew, I really did enjoy knitting this cardi. It was straight forward, simple, the smocked fronts helped keep it interesting enough, and I really am quite in love with that square neckline. I feel that it looks so elegant.


I made a few modifications on the bottom ribbing, button edges and the neckline. Instead of using a US 6, I opted for a 5 as I felt it would look a little cleaner. Once the body is completely finished (sleeves, shoulders and all) the pattern then directs to work on the neck edge but as I was feeling inspired by kathok's Farmhouse Pretty (me) on Ravelry with that lovely, clean neckline edge, I knit the button bands first. I adjusted the number of picked up stitches to 87 as I felt  it needed more stitches to look its best and I made sure to knit 3 at the neck edge so as to have a stitch to pick up into. I positioned 9 button holes on the button band. Once the button bands were finished, I then moved on to the neck edge where I picked up 8 extra stitches on the edge of each button band and 22 stitches where the pattern suggested picking up 11 stitches from the long edge of the square (153 sts total). I added another button hole to make a total of 10 button holes for the cardi. Oof, technical stuff! 

In a previous post I mentioned wanting simple but eye-catching buttons, which is what I did. 10 simple round 2-hole mother-of-pearl buttons. I love the way they shimmer and take on the tones around them.


The pattern uses a saddle shoulder technique which I had never done before and to be honest, I was a little nervous about whether I would like the fit. Verdict: when I first tried it on, I thought that I didn't like it, but as I've had it on a little more, it's starting to grow on me. I think I've reached the point where I can comfortably say that I like it (although one shoulder fits better than the other?) and would make another sweater with this kind of construction. Oh yes, however, thank you, Quill on Ravelry for noting it, but the pattern should read slip 1, purl 1, turn, on the wrong side of the saddle shaping!


I really love this cardi. My first sportweight cardi for me! I think more knitting for me is bound to happen based on this great experience and result. I am overall very pleased with the fit and the way the yarn looks and I hope it will wear well. I'm keeping my fingers crossed that it won't pill too much. Aren't those smocks just lovely? And as I already said, I really adore this neckline! It sits beautifully in an unbroken line. I guess I do indeed feel so pretty wearing this!


P.S. I felt a little awkward having pictures of me taken like this as I'm really not used to it!